

How To Update Asus Mobo Bios

AMD Ryzen 5000-series processors have arrived, and whether you're ownership one to upgrade your current PC or starting from scratch with a new system build, y'all'll want to make sure your motherboard's firmware, or BIOS, is fully updated. Without the latest firmware, your system might not kick at all, or you lot might not go the best performance out of your PC. To help you with this process, we've put together this handy guide to performing a BIOS update on your ASUS AMD motherboard.
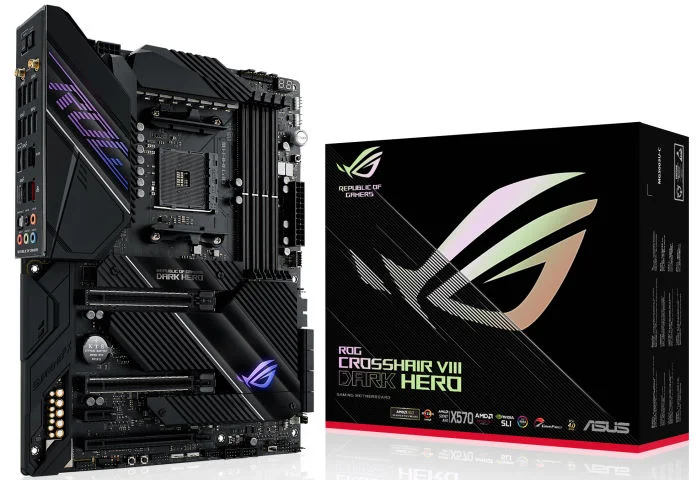 The ROG Crosshair Viii Dark Hero, our latest X570 motherboard
Before y'all make plans to build or update your PC for these new CPUs, you should start make sure that your motherboard supports them. The latest firmware versions for our A520, B550, and X570 motherboards support Ryzen 5000-series processors from twenty-four hours ane. Compatible firmware updates for earlier Socket AM4 platform motherboards are projected to begin rolling out in the first quarter of 2021. If you are planning a new system now, you should purchase an A520, B550, or X570 motherboard for the best possible experience.
We brand every attempt to ensure that our motherboards leave the factory with the latest firmware installed. All the same, if you are edifice a new PC early in the life cycle of a new CPU generation, at that place is a remote chance that you may receive a motherboard from older stock whose installed firmware is non compatible with a Ryzen 5000-series CPU, fifty-fifty if the motherboard model itself is compatible.
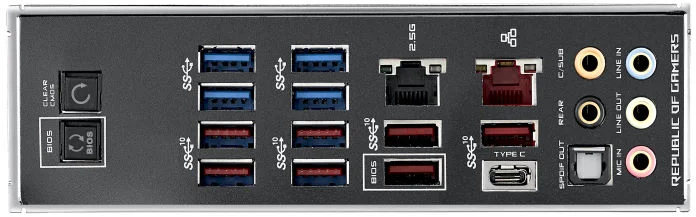
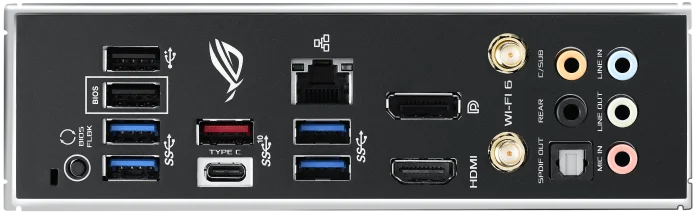
BIOS FlashBack™ button on left
If you plan to be an early on adopter of Ryzen 5000-serial CPUs and are starting a new build from scratch, nosotros strongly recommend you cull a motherboard that includes our USB BIOS FlashBack™ characteristic so that you lot can update its firmware even without a compatible CPU on hand. Many of our ROG Strix and ROG Crosshair 8 X570 motherboards include USB BIOS FlashBack™, as does the recently released TUF Gaming X570-PRO (Wi-Fi). All of our ROG Strix and TUF Gaming B550 motherboards include USB BIOS FlashBack™, as well. Nosotros'll draw how to use USB BIOS FlashBack™ in detail later in this article.
If your current PC includes a compatible A520, B550, or X570 motherboard and you plan to upgrade to a Ryzen 5000-series processor, delight make certain to update the motherboard'due south firmware using one of the methods below before installing your new CPU.
You can also watch our convenient video guide below to acquire more:
With all that out of the way, you're probably wondering how exactly to get your motherboard's BIOS gear up for Ryzen 5000-series CPUs. We provide three simple means to perform this upgrade: from within Windows, from inside the motherboard firmware, and even without a compatible CPU or memory installed at all. Here'due south how to carry out each method.
Get the correct firmware for your motherboard
Before you proceed with whatever firmware update, you should make annotation of whatever custom settings you take applied to your system, such equally a CPU overclock, ASUS DOCP memory overclocking, custom fan control curves, or any other BIOS settings specific to your build, as those settings volition not be retained after the upgrade. Your motherboard's firmware tin save screenshots to a connected USB flash drive (commonly if you printing F12 in the firmware), or you tin can simply have photos of your monitor with your phone. To access the firmware and collect this information, restart your PC and press Del or F2 repeatedly until the firmware interface appears.
Whether you initiate the BIOS update process from within Windows or from the BIOS interface itself, your organization may reboot to a prompt request you lot to press F1 to re-enter the BIOS upon completion of the update. You should exercise so, as you lot will need to re-configure the new firmware to re-apply any custom settings you fabricated upon initial setup. Once you have reapplied any settings you wish to change, press F10 to save the changes, exit the firmware, and kick into your operating arrangement.
To obtain the correct firmware update, you'll need to know the exact model of ASUS motherboard you lot have installed in your PC. If you don't know this information off the top of your caput, you tin can download and run a free system monitoring program like HWiNFO64, which volition tell you your motherboard's model name in its primary interface. For instance, a full model name of one of our AMD X570 motherboards might exist "ROG Crosshair Viii Hero (Wi-Fi)." We'll use that lath every bit an instance throughout this commodity.
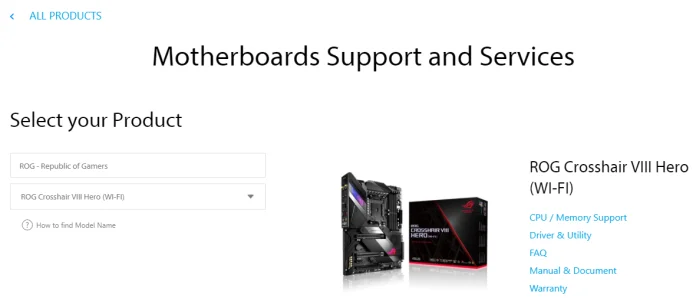
Side by side, y'all'll need to find your motherboard's support page. You lot can get-go this process at our defended back up portal, which will guide you straight to the correct support page by request y'all for your motherboard's platform and model name.
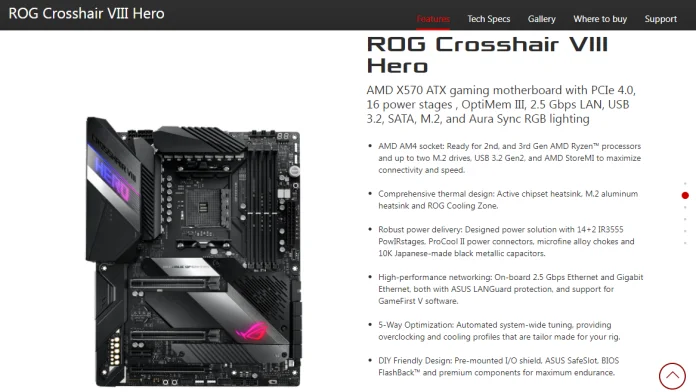
You lot tin besides simply search for your motherboard's model name using a service like Google. The motherboard'south product page volition often exist the meridian search result. From the product page, seek out the "Back up" link in the upper right corner of the page.
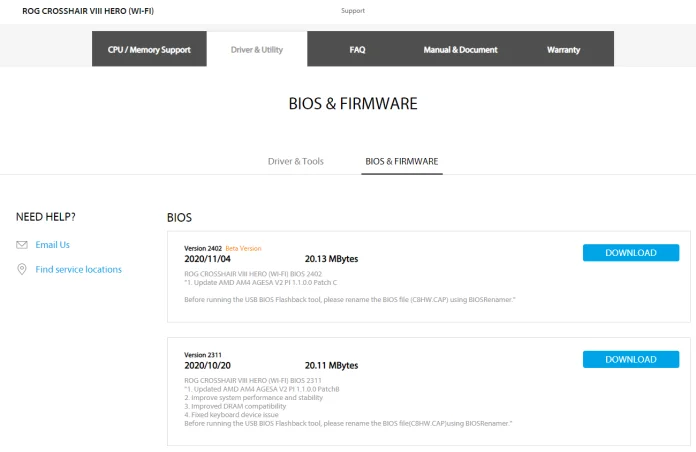
Once you've reached your motherboard's support page, click the "Driver & Tools" tab, so notice the "BIOS & Firmware" link slightly further downward the page. Under the "BIOS" heading, y'all'll find a number of firmware files available for download. The top-nearly file is the almost contempo. To ensure that the firmware you lot intend to install supports Ryzen 5000-series CPUs, check its patch notes and ensure that it includes the notice "Updated AMD AM4 AGESA V2 PI ane.1.0.0 PatchB" at a minimum.
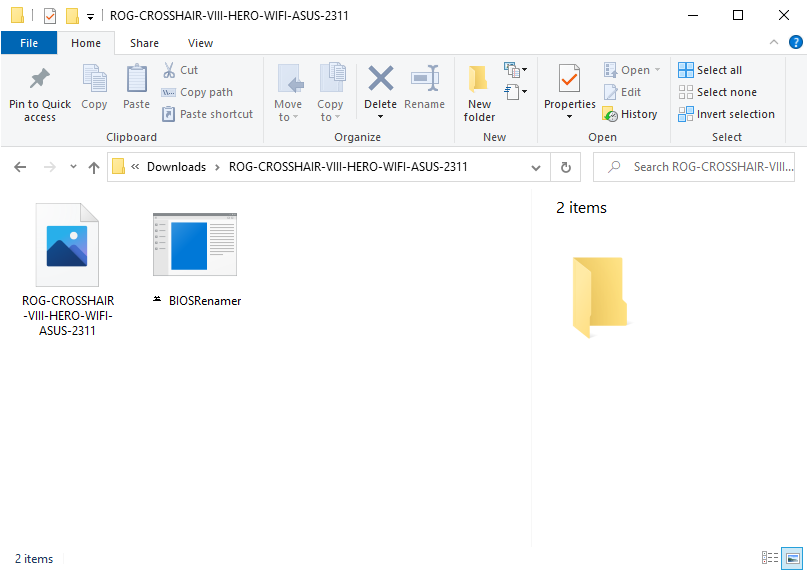
In one case yous've located the latest firmware version for your motherboard, click the "Download" push button. Your organization will proceed to download a compressed Cipher annal. Locate the downloaded ZIP file in Windows Explorer (commonly in your Downloads folder unless you've remapped it), right-click it, and choose "Excerpt all" from the context menu. A window volition appear suggesting a destination folder. You don't take to change information technology—simply click "Extract." One time this process is complete, you'll have a new folder in your Downloads directory (or your custom download destination) whose name includes both your motherboard's model name and the BIOS version you've downloaded. Inside this folder, you'll find a BIOS file with the extension .cap, as well as a utility called "BIOSRenamer." We'll discuss how to use these files soon.
Update your firmware in Windows with AI Suite Three
Now that you have the latest version of your motherboard's firmware downloaded, you lot can install it in three ways.
If your system is already congenital and running, y'all can update your motherboard'due south firmware from within Microsoft Windows. To update your motherboard'southward firmware in Windows, yous'll need our AI Suite Three utility, which is also available for gratuitous from your motherboard's support page. If you don't already accept AI Suite Iii installed, detect its installer download in the Utilities department of the "Driver & Tools" tab on your motherboard's support page. If you're installing AI Suite III for the first time, you may need to let that procedure cease and restart your computer before proceeding.
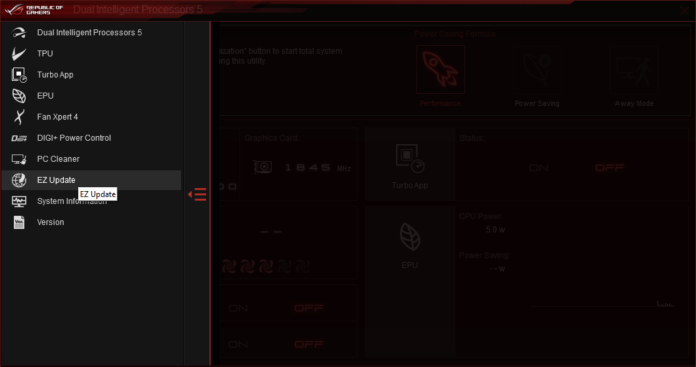
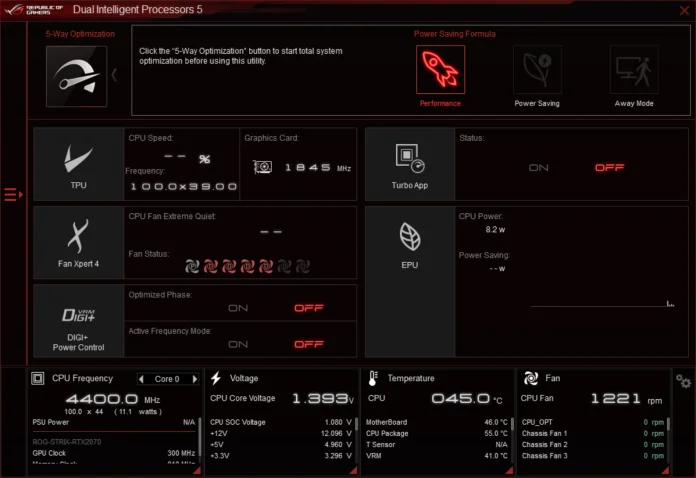
If y'all already have AI Suite 3 installed, launch information technology from the Windows Start bill of fare or double-click its icon in your organisation tray. Click the listing icon at the left edge of the window to view all of the AI Suite components you have installed, and then click EZ Update.
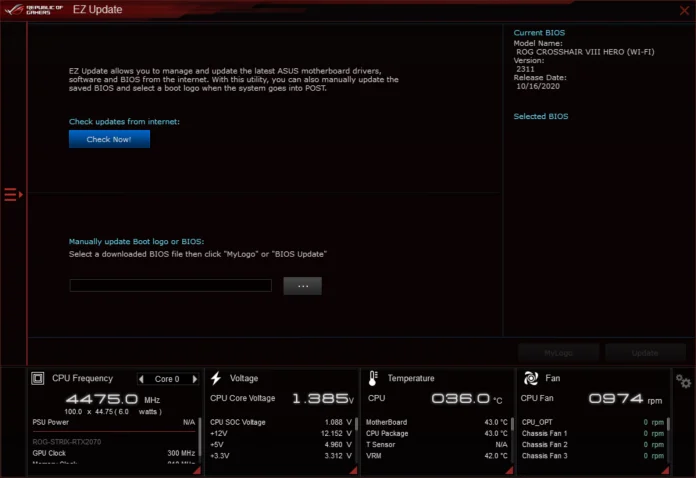
In the EZ Update window, wait for the section marked "Manually update kicking logo or BIOS," then click the button with three dots next to the empty directory field. This volition bring up a File Explorer window where you can navigate to the BIOS file you downloaded and extracted before. Choose the file you lot desire to utilise to perform the upgrade, then click "Open up."
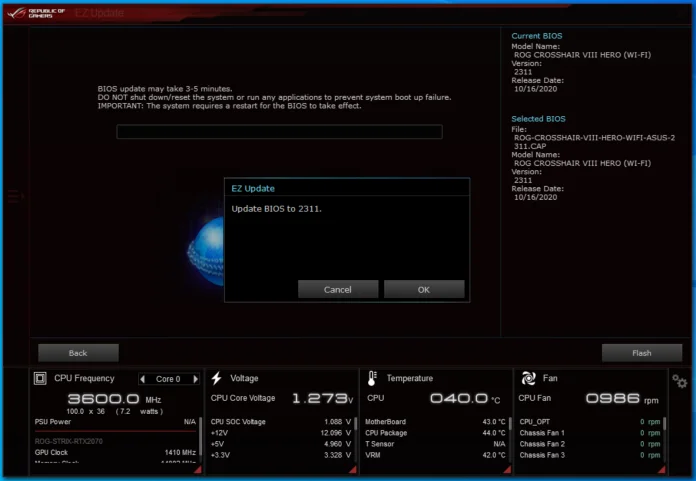
If you have selected a valid BIOS file, EZ Update will bear witness the electric current BIOS you have installed and the details of the new BIOS yous intend to install on the right-hand side of the window. Confirm that you desire to update the firmware by clicking the "Flash" button and clicking "OK" on the resulting prompt. Your PC will restart and update its firmware.
Flash your firmware from your BIOS with EZ Flash 3
If for whatsoever reason you lot'd rather not update your firmware from inside Windows, you tin can deport out the process from your motherboard'southward BIOS interface using our EZ Flash 3 utility. One way to use EZ Wink three is to access the new BIOS file directly from your PC's primary storage device. To use this method, only download the latest BIOS file, excerpt it using the steps we described earlier, brand note of the directory in Windows where the file is located—normally your Downloads binder—then restart your PC. Printing Del or F2 repeatedly as shortly as the PC restartsto enter the BIOS interface.
The first fashion to upgrade your BIOS inside EZ Flash is to navigate directly to the directory on your main storage device that contains the BIOS file. To use this method, only download the latest BIOS file, extract it using the steps we described before, make note of the directory in Windows where the file is located—usually your Downloads folder—then restart your PC.
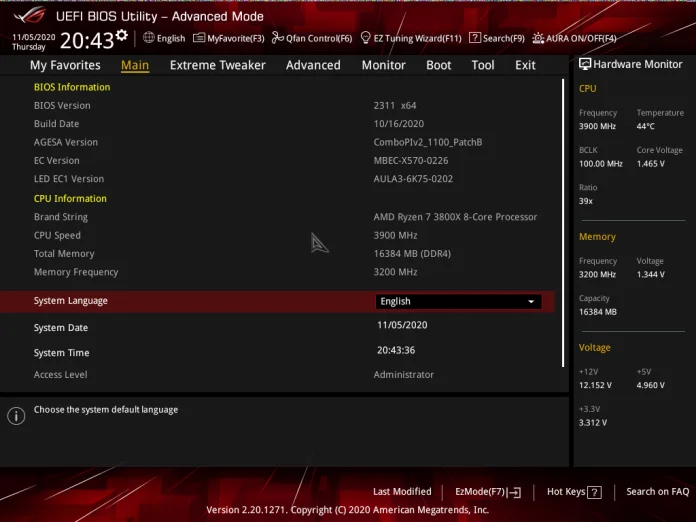
Once your PC loads the BIOS interface, you'll first want to make sure you're in Advanced Mode. Look at the lower right corner of the screen and check whether the prompt says "EzMode (F7)" or "Advanced Way (F7)." If the prompt says Advanced Mode, press F7.
In the Avant-garde Style interface, look along the top of the screen for the "Tool" heading. Click it and find "ASUS EZ Wink 3 Utility" in the resulting list of tools. Click "ASUS EZ Flash 3 Utility" to enter the firmware update tool.

Once you've entered the EZ Flash 3 utility, look for your main storage device's Windows partition. Instead of a drive letter, you will come across a list of partitions in the format fsx, such as "fs0, fs1, fs2, fs3" and and so on. Your primary Windows partition, if information technology occupies your entire system drive, will have a size close to your SSD'southward rated capacity. For example, the 500GB principal SSD in our example system has a listed size of 476292MB in the Crosshair Viii Hero (Wi-Fi)'s firmware interface, and information technology has the identifier fs3.
Side by side, navigate to the full path of the folder you downloaded and extracted your BIOS to, in our example "fs3:\Users\Jeff\Downloads\ROG-CROSSHAIR-Eight-HERO-WIFI-ASUS-2311," as shown above. The new firmware file should exist the merely file visible in this binder. Click the file or press Enter, and EZ Wink 3 will inquire y'all whether you lot wish to read the file. If the file is successfully read, the tool volition tell you lot what version you are updating to and its publication date. Verify that this is the file you want to install, then click "Yeah." The system will process the file and and so reboot.
If y'all'd rather not navigate the entire Windows directory tree, you lot can also use a wink drive with EZ Flash 3. To practice this, yous'll need a drive formatted with either of the FAT16 or FAT32 file systems. If you take a wink drive and are unsure of what file arrangement information technology's set upward to apply, you should reformat information technology. Move any data that y'all want to keep off of it and onto another storage device. In one case you've moved any information you wish to save, right-click the drive in File Explorer, select "Format" from the context bill of fare, and then brand sure that the file system is set to utilize FAT32. Be aware that formatting the drive volition delete any remaining data on the disk.
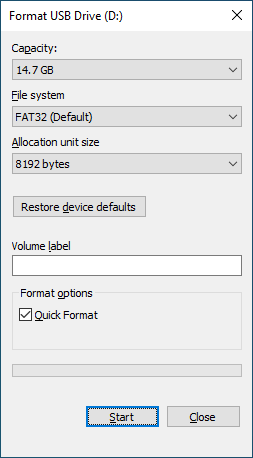
When you're ready to format the drive, click "Outset" at the bottom of the window. Once the drive is formatted, you can copy the new BIOS file y'all downloaded to it. Once the file is on the drive, leave it in the USB port, restart your computer, and enter the BIOS using the steps to a higher place.
Next, notice your USB storage device in the listing of drives fastened to your computer. As with your master SSD, it's commonly easiest to observe information technology by the listed size in MB (for example, you might meet 15063 MB for a 16GB flash drive). Once yous've identified your drive in the list, click it, then observe the new firmware file on the USB flash drive. (Information technology may be easier to conduct out this process if that file is the only ane on your bulldoze).
Once yous've found the file, click it and confirm that you want the firmware to read the new file to carry out the update, as described above.
Kickoff from scratch with USB BIOS FlashBack™
If you discover that your new PC with a Ryzen 5000-series processor volition not perform a power-on self-test, or Mail service, when you attempt to kicking it upwards for the start time, its installed firmware may not exist compatible with those processors. If your motherboard includes the characteristic, yous should update its firmware using USB BIOS FlashBack™. BIOS FlashBack™ only requires a power supply and a USB flash bulldoze to run at a minimum, but even if you discover that your fully assembled system does not boot, you lot can still apply this method to bring its firmware up to appointment.
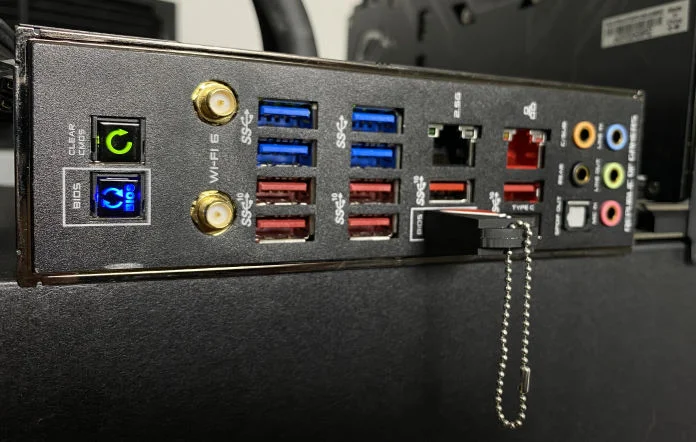
Rear I/O of the ROG Strix B550-F Gaming (Wi-Fi); BIOS FlashBack™ push button visible at left
To apply USB BIOS FlashBack™, you volition need another computer that you can use to create a flash drive loaded with the necessary firmware. Follow the same instructions for downloading the latest firmware to that PC nosotros discussed before, and follow the aforementioned reformatting instructions that we shared in the EZ Flash iii section to prepare your wink bulldoze for use with this feature.
Once you lot've downloaded the BIOS file from the back up page from your motherboard and extracted information technology from its archive, at that place is ane extra step you'll need to take to use it with USB BIOS FlashBack™. Navigate to that binder and look for the BIOSRenamer application that comes with each download. Double-click the BIOSRenamer application to run information technology. The plan should open a command prompt window noting its successful execution and prompt y'all to press whatsoever key to exit. Later this utility runs, your BIOS file should be named so that BIOS FlashBack™ can recognize it. Copy this renamed file over to your wink drive, eject it, and conduct information technology over to the motherboard or system yous wish to update.
Before attempting to utilise BIOS FlashBack™ on the motherboard you're updating, make certain that you lot've hooked upwardly a power supply to the motherboard's 24-pin ATX12V connector and all of its 4- or 8-pin auxiliary EPS connectors. Make certain that the power supply is plugged into a wall outlet, besides. As nosotros noted earlier, you can as well apply BIOS FlashBack™ on a completely assembled PC if needed.
Once your PSU is connected to the motherboard, plough on the power supply using the switch on its back console if you have not already. Depending on your motherboard model, you may see some onboard LEDs or buttons illuminate. This indicates that your motherboard is receiving ability.
Adjacent, look for the USB port on the dorsum panel that's labeled "BIOS." Insert your prepared flash drive into this port. And then wait for a nearby push marked "BIOS," printing it, and concur it until an LED indicator begins to blink slowly, either on the push button itself or in a nearby location on the motherboard. If the BIOS file is read successfully, the LED will begin to blink faster, indicating that the BIOS is being updated. Wait until the LED goes out. At this point, the BIOS has been successfully updated, and you can attempt to boot your PC once again.
If the BIOS FlashBack LED turns solid after you initiate the process, the tool has come across a problem. This may betoken that at that place is an outcome with the BIOS file yous are attempting to utilise, the formatting of your flash drive, or some other issue preventing the updating routine from running. You might attempt to re-run the procedure using a different flash drive or to reformat your existing drive and try again. You should also double-check the proper noun of the BIOS update you are attempting to install against the support folio of your motherboard—the proper file name for BIOS FlashBack is listed alongside each update. If the BIOS file proper name is not correct, ensure that it matches the listed name for your motherboard.
Get up to speed with the latest firmware for Ryzen 5000
If you need to upgrade your ASUS motherboard's firmware for Ryzen 5000-series CPUs, you'll find that it'southward a quick and easy process from within Windows, within your motherboard'southward BIOS interface, or with USB BIOS FlashBack™. No matter which method you cull, you'll exist up and running with your new CPU in no time. If you still have questions after reading through this guide, please achieve out to our back up teams for assistance.
Source: https://edgeup.asus.com/2020/guide-update-your-asus-motherboards-bios-for-amd-ryzen-5000-series-processors/
Posted by: snelldicitch.blogspot.com
0 Response to "How To Update Asus Mobo Bios"
Post a Comment